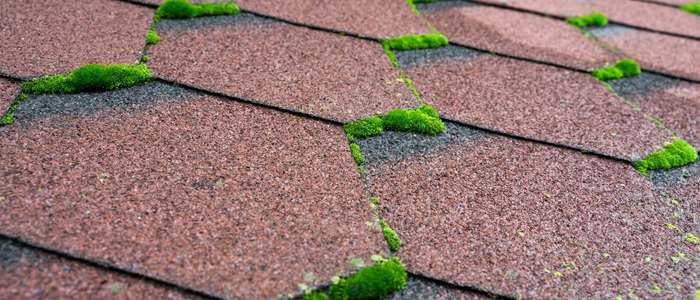
You’ve noticed dark green patches spreading across your shingles, and every time it rains, your roof looks slippery and damp. Perhaps you’ve even seen leaves and debris accumulating around those mossed areas. It’s a common problem, especially for homes surrounded by trees, shaded areas, or climates with high humidity. And now you’re wondering: How do I safely remove moss from my roof before it causes more serious damage?
Moss growth may seem harmless at first, but it can trap moisture, weaken shingles or tiles, and eventually shorten your roof’s lifespan. Over time, moss can cause leaks, accelerate material decay, and even compromise structural integrity. Knowing how to remove moss from roof surfaces safely and effectively is critical for homeowners who want to maintain the value and durability of their property.
In this guide, you’ll learn step-by-step approaches to moss removal, understand the benefits of professional services, and discover preventive strategies that keep moss from returning. By the end, you’ll feel confident taking action whether you plan to tackle moss yourself or hire a qualified professional to preserve the life and appearance of your roof.
Why Moss Grows on Your Roof
Moss forms when spores land on damp, shaded surfaces and find an environment rich in moisture. Roofs that retain water, have poor drainage, or receive little sunlight are prime candidates for moss growth. Aging shingles or tiles can exacerbate the problem, as older materials absorb water more easily and create the ideal environment for moss to thrive.
Moss doesn’t just look unsightly; it can lift shingles or tiles, creating small gaps where water can penetrate. Over time, trapped moisture can lead to rot, leaks, and even damage to the underlying roof deck. Understanding the conditions that allow moss to grow helps homeowners take proactive steps to remove it before serious issues arise.
Moss can also accelerate the breakdown of roofing granules and compromise the protective layers of your roof, reducing its overall lifespan. For homeowners asking how to remove moss from roof, recognizing why moss grows is the first step toward safe and effective solutions.
How to Tell If Moss Is Damaging Your Roof
Identifying moss early is critical to prevent long-term damage. Homeowners should watch for the following warning signs:
- Dark green or black patches forming across shingles or tiles
- Slippery roof surfaces after rainfall, which create safety hazards
- Shingle curling, cracking, or other visible damage
- Accumulation of moisture on roof surfaces or around edges
- Gutters clogged with moss debris, leaves, and organic material
- Signs of decay on the roof deck or fascia boards
- Uneven roof texture or areas that feel spongy when walked upon
Detecting these signs early allows homeowners to act promptly, using either professional or DIY solutions to prevent moss from compromising the roof’s structural integrity. Addressing these issues quickly ensures your home remains protected, dry, and visually appealing.
Common Reasons for Moss Growth on Roofs
| Cause | How it Affects Roof |
| Shaded areas with poor sunlight | Moss thrives in damp, shaded spots where water evaporates slowly |
| Moisture retention | Prolonged wet conditions encourage moss growth and spread |
| Aging roofing materials | Older shingles or tiles absorb and hold more water, creating moss-friendly conditions |
| Nearby trees or debris | Leaves, branches, and organic matter trap moisture, accelerating growth |
Many homeowners overlook the impact of surrounding trees and debris on moss growth. Overhanging branches can provide constant shade and contribute to trapped water. Combined with poor ventilation and drainage, these factors create an environment where moss can flourish unchecked. Understanding the causes helps homeowners adopt the right preventive measures alongside moss removal.
Choosing the Right Roofing Materials and Removing Moss Safely
Certain roofing materials are more prone to moss growth. Asphalt shingles and wooden shakes absorb moisture, making them vulnerable to moss colonization. In contrast, metal, slate, and tile roofs are less susceptible but can still develop moss in shaded or damp areas.
Safe removal methods vary depending on the roof material:
- Soft washing with low-pressure moss-killing solutions prevents damage to delicate shingles
- Gentle scrubbing removes moss manually from small patches without scraping the protective layer
- Chemical treatments eliminate moss and prevent regrowth, but must be compatible with the roof type to avoid discoloration or material degradation
Homeowners should always consider material compatibility when addressing moss growth. For anyone researching how to remove moss from roof, understanding the material-specific approach is essential for effective and safe results.
Moss can also hide early damage on older roofs, so careful removal not only improves appearance but reveals areas that may need repair or inspection.
Step-by-Step Professional Moss Removal Process
- Inspect the Roof: Identify moss patches, weak spots, and potential structural issues
- Clear Debris: Remove leaves, twigs, and gutter buildup to prepare the roof surface
- Apply Moss Removal Solution: Use an appropriate moss-killing product carefully and evenly
- Allow Solution to Sit: Let it penetrate and kill moss without harming shingles
- Gently Scrub Mossed Areas: Soft brushes or brooms ensure effective removal without damage
- Rinse with Low-Pressure Water: Wash away moss and residue safely
- Final Inspection & Preventive Treatment: Check for missed areas and apply treatments to inhibit regrowth
Following a professional process ensures moss is completely removed and reduces the risk of damage or premature roof deterioration. Homeowners in Irving,tx have found that routine inspections combined with professional moss removal significantly extends the life of their roofing materials.
Benefits of Professional Moss Removal Services
Professional moss removal offers advantages that go well beyond what most DIY methods can achieve. Trained professionals ensure the safe handling and proper application of cleaning chemicals, protecting both roofing materials and surrounding landscaping from damage. Their expertise also helps prevent harm caused by aggressive scrubbing or the use of improper tools, which can weaken shingles and shorten roof lifespan. With professional service, moss is completely removed, reducing the risk of leaks, rot, and long-term structural issues.
Homeowners benefit from significant time savings and avoid the physical effort and safety risks associated with roof work. In addition, follow-up treatments and preventive measures provide long-term roof protection, while the improved appearance helps preserve overall property value. For homeowners focused on maintaining their roof’s health and aesthetics, professional moss removal delivers thorough, safe treatment and lasting peace of mind.
DIY Moss Removal vs Professional Services
DIY Moss Removal:
- Pros: Lower cost, immediate action, control over timing
- Cons: Safety risks from heights, potential roof damage, incomplete removal, no warranty or guarantees
Professional Services:
- Pros: Expertise with different roofing materials, proper tools, thorough and safe treatment, warranty coverage
- Cons: Higher upfront cost, scheduling required
Homeowners weighing options should consider the long-term benefits of professional moss removal against potential risks of DIY methods. For many, hiring a professional ensures thoroughness and durability that DIY efforts cannot consistently achieve.
Main Elements That Impact Moss Removal Costs
| Factor | Impact on Cost |
| Roof size and slope | Larger or steeper roofs require more labor and solution |
| Moss severity | Dense or thick moss requires longer treatment and more products |
| Roof material type | Delicate shingles need specialized methods to prevent damage |
| Accessibility | Hard-to-reach or multi-level roofs require safety equipment and additional labor |
| Preventive treatments | Application of zinc/copper strips or moss inhibitors adds cost but prevents recurrence |
Understanding these cost factors helps homeowners budget for professional moss removal and ensures realistic expectations for both time and money spent.
How to Choose the Right Moss Removal Contractor
- Verify experience specifically with roof moss removal
- Confirm licensing, insurance, and professional references
- Evaluate the use of safe, eco-friendly chemicals
- Compare multiple estimates and inquire about service guarantees
- Ensure contractors provide advice for ongoing prevention and follow-up care
- Assess communication skills and transparency in explanations
Selecting the right professional ensures your roof is treated safely, completely, and with long-term protection in mind. Homeowners in Irving,tx have seen significant improvements in roof longevity by relying on trained moss removal specialists.
How to Protect Your Roof from Moss Damage
- Trim overhanging branches to allow sunlight and airflow
- Clean gutters regularly to prevent water accumulation
- Remove leaves and debris from roof surfaces promptly
- Apply moss inhibitors or install zinc/copper strips along the ridge
- Inspect roof periodically for early signs of moss
- Ensure proper attic ventilation and drainage to reduce dampness
- Document all inspections and treatments for future reference
Regular maintenance not only delays moss regrowth but also preserves roofing materials, reduces repair costs, and protects overall home value.
FAQs
What time of year is best for moss removal?
The best time for moss removal is spring or early fall, when temperatures are mild and moisture levels are balanced. During these seasons, moss is actively growing, making it easier to remove and treat effectively. Mild weather also allows cleaning solutions to work properly and helps prevent damage to roofing materials. Regular maintenance during these periods can reduce future moss growth and extend the life of your roof.
What tools do I need to remove moss?
To remove moss effectively, you’ll need a few basic tools. These include a stiff-bristle brush or roof broom for scrubbing, a garden sprayer for applying cleaning solutions, and a hose with moderate water pressure for rinsing. Safety equipment such as non-slip shoes, gloves, and a safety harness is also important when working on roofs. For larger areas, a low-pressure washer and a commercial moss remover may be helpful. Using the right tools ensures safe, thorough, and damage-free moss removal.
How long does it take for vinegar to kill moss?
Vinegar typically begins killing moss within a few hours of application, with visible browning and drying appearing in 24 to 48 hours. However, complete removal may take several days, depending on the thickness of the moss, weather conditions, and sunlight exposure. For best results, vinegar should be applied on a dry, sunny day and may require repeated treatments for heavy growth.
final thought
Moss removal is more than a cosmetic fix; it preserves roof durability, prevents leaks, and protects the structural integrity of your home. Professional services combined with preventive care save homeowners both time and money, maintaining curb appeal and overall functionality.
Addressing moss growth early ensures your roof remains a reliable protective layer against the elements. Homeowners who routinely inspect, treat, and maintain their roofs enjoy safer, longer-lasting roofing systems. For anyone wondering how to remove moss from roof, acting proactively is always better than waiting until moss causes significant damage.
Take time to inspect your roof, treat any moss early, and implement preventive measures to ensure your home remains protected for years to come. So, when will you schedule your next roof moss inspection to protect your investment?